Linux から ToS (DSCP) を利用したテストを行う
Linux から ToS (DSCP) を利用したテストを行う方法についてメモしておきます。 検証は CentOS8 で実施しています。
PHB / IP Precedence / ToS / DSCP 一覧
おさらいの意味で PHB / IP Precedence / ToS / DSCP の一覧を掲載しておきます。
| No. | PHB | IP Precedence (BIN) | IP Precedence (DEC) | ToS (BIN) | ToS (DEC) | ToS (HEX) | DSCP (BIN) | DSCP (DEC) | DSCP (HEX) |
|---|---|---|---|---|---|---|---|---|---|
| 1 | CS1 | 001 | 1 | 00100000 | 32 | 0x20 | 001000 | 8 | 0x8 |
| 2 | AF11 | 001 | 1 | 00101000 | 40 | 0x28 | 001010 | 10 | 0xA |
| 3 | AF12 | 001 | 1 | 00110000 | 48 | 0x30 | 001100 | 12 | 0xC |
| 4 | AF13 | 001 | 1 | 00111000 | 56 | 0x38 | 001110 | 14 | 0xE |
| 5 | CS2 | 010 | 2 | 01000000 | 64 | 0x40 | 010000 | 16 | 0x10 |
| 6 | AF21 | 010 | 2 | 01001000 | 72 | 0x48 | 010010 | 18 | 0x12 |
| 7 | AF22 | 010 | 2 | 01010000 | 80 | 0x50 | 010100 | 20 | 0x14 |
| 8 | AF23 | 010 | 2 | 01011000 | 88 | 0x58 | 010110 | 22 | 0x16 |
| 9 | CS3 | 011 | 3 | 01100000 | 96 | 0x60 | 011000 | 24 | 0x18 |
| 10 | AF31 | 011 | 3 | 01101000 | 104 | 0x68 | 011010 | 26 | 0x1A |
| 11 | AF32 | 011 | 3 | 01110000 | 112 | 0x70 | 011100 | 28 | 0x1C |
| 12 | AF33 | 011 | 3 | 01111000 | 120 | 0x78 | 011110 | 30 | 0x1E |
| 13 | CS4 | 100 | 4 | 10000000 | 128 | 0x80 | 100000 | 32 | 0x20 |
| 14 | AF41 | 100 | 4 | 10001000 | 136 | 0x88 | 100010 | 34 | 0x22 |
| 15 | AF42 | 100 | 4 | 10010000 | 144 | 0x90 | 100100 | 36 | 0x24 |
| 16 | AF43 | 100 | 4 | 10011000 | 152 | 0x98 | 100110 | 38 | 0x26 |
| 17 | CS5 | 101 | 5 | 10100000 | 160 | 0xA0 | 101000 | 40 | 0x28 |
| 18 | EF | 101 | 5 | 10111000 | 184 | 0xB8 | 101110 | 46 | 0x2E |
| 19 | CS6 | 110 | 6 | 11000000 | 192 | 0xC0 | 110000 | 48 | 0x30 |
| 20 | CS7 | 111 | 7 | 11100000 | 224 | 0xE0 | 111000 | 56 | 0x38 |
ping に ToS を付与する
最も簡単なのは ping のオプションで ToS を付与する方法です。 -Q オプションに ToS を指定するだけなので手軽です。
man には以下のように書かれています。
-Q tos
Set Quality of Service -related bits in ICMP datagrams. tos can be decimal (ping only) or hex number.
In RFC2474, these fields are interpreted as 8-bit Differentiated Services (DS), consisting of: bits 0-1 (2 lowest bits) of separate data, and bits 2-7 (highest 6 bits) of Differentiated Services Codepoint (DSCP). In RFC2481 and RFC3168, bits 0-1 are used for ECN.
Historically (RFC1349, obsoleted by RFC2474), these were interpreted as: bit 0 (lowest bit) for reserved (currently being redefined as congestion control), 1-4 for Type of Service and bits 5-7 (highest bits) for Precedence.
ToS は 10 進数と 16 進数の両方で指定することが可能です。 例えば下記の例では 10 進数と 16 進数で ToS を指定していますが、どちらも CS1 (0x20) で ICMP を送信します。
下記の例ではどちらも AF11 (0x28) で ICMP を送信します。
firewalld の Direct Rule を使って全出力トラフィックに DSCP を付与する
「ping に ToS を付与する」方法では icmp パケットには ToS を付与出来るものの、その他の通信に ToS を付与することは勿論出来ません。 firewalld の Direct Rule を使うことで全ての出力トラフィックに DSCP を付与することが出来ます。 先に注意点を記載しておきますが、ping コマンドなどで ToS 値を指定しても Direct Rule の方が優先されます。 DSCP を付与すると、firewalld を利用するので、まず firewalld を起動しておきます。 必要に応じて自動起動の設定も実施しておきます。
Direct Rule を追加します。 ここでは「全てのトラフィック (0.0.0.0/0) を対象」にしていますが、複雑な条件を指定することで「特定のトラフィックのみ、DSCP を付与する」ことも可能です。
firewall-cmd --permanent --direct --add-rule ipv4 mangle OUTPUT 0 -d 0.0.0.0/0 -j DSCP --set-dscp-class AF21
Direct Rule を追加すると /etc/firewalld/direct.xml に定義されます。
# cat /etc/firewalld/direct.xml
<?xml version="1.0" encoding="utf-8"?>
<direct>
  <rule ipv="ipv4" table="mangle" chain="OUTPUT" priority="0">-d 0.0.0.0/0 -j DSCP --set-dscp-class AF21</rule>
</direct>
追加した Direct Rule を反映するには firewalld を再起動する必要があります。
反映された Direct Rule を確認するには firewall-cmd --direct --get-all-rules を実行します。 下記ではしっかり Direct Rule が反映されていますので、これで全てのトラフィックに AF21 (0x28) が付与されます。
# firewall-cmd --direct --get-all-rules
ipv4 mangle OUTPUT 0 -d 0.0.0.0/0 -j DSCP --set-dscp-class AF21
Direct Rule を削除するには以下のように実行します。 具体的には --remove-rule を指定します。
firewall-cmd --permanent --direct --remove-rule ipv4 mangle OUTPUT 0 -d 0.0.0.0/0 -j DSCP --set-dscp-class AF21
Direct Rule を変更しましたので firewalld を再起動して変更を反映します。
tcpdump でパケットキャプチャする
tcpdump で ToS 値をキャプチャする方法について記載します。
ToS 値を表示する
tcpdump に -v を指定することでキャプチャしたパケットの ToS 値を 16 進数で表示することが出来ます。
特定の ToS 値が指定されたパケットのみ、キャプチャする
「特定の ToS 値が指定されたパケットのみ、キャプチャする」には ip[1]==[ToS] というオプションを指定します。 例えば EF (0xb8) の付与されたパケットのみをキャプチャするには以下のように実行します。 10 進数と 16 進数の両方で指定することが可能ですが、結果は 16 進数で表示される為、16 進数指定の方が分かりやすいかもしれません。
実際にキャプチャした結果は以下の通りです。
# tcpdump -i eth0 -v ip[1]==184
tcpdump: listening on eth0, link-type EN10MB (Ethernet), capture size 262144 bytes


10:00:17.946835 IP (tos 0xb8, ttl 64, id 41490, offset 0, flags [DF], proto ICMP (1), length 84)
    10.0.0.1 > 10.0.0.2: ICMP echo request, id 14873, seq 1, length 64
10:00:17.946912 IP (tos 0xb8, ttl 64, id 21118, offset 0, flags [none], proto ICMP (1), length 84)
    10.0.0.2 > 10.0.0.1: ICMP echo reply, id 14873, seq 1, length 64
複数条件のうちひとつでも一致したパケットをキャプチャする (or 条件)
「CS1 (0x20) と CS2 (0x40) のパケットのみ、キャプチャする」には以下のように or を用いて条件を指定します。
特定のホストから、且つ、複数条件のうちひとつでも一致したパケットをキャプチャする (or 条件と and 条件の組み合わせ)
「特定ホストからの CS1 (0x20) と CS2 (0x40) のパケットのみ、キャプチャする」には以下のように or と and を組み合わせて条件を指定します。 この場合、括弧を使って条件を指定することになりますが、エスケープしないと括弧はエラーになってしまいます。 その為、以下のようにダブルクォートで括るか、もしくは '\' で括弧をエスケープします。
tshark でパケットキャプチャする
tshark で ToS 値をキャプチャする方法について記載します。
tshark のインストール
最初に tshark をインストールします。
インストールされました。
特定の ToS 値が指定されたパケットのみ、キャプチャする
「特定の ToS 値が指定されたパケットのみ、キャプチャする」には tcpdump 同様、ip[1]==[ToS] というオプションを指定します。 以下では EF (0xb8) の設定されたパケットのみをキャプチャしています。
実際の実行例は以下の通りです。 EF (0xb8) のパケットのみをキャプチャした例です。
# tshark -i eth0 ip[1]=0xb8
Running as user "root" and group "root". This could be dangerous.
Capturing on 'eth0'
    1 0.000000000 10.0.0.1 → 10.0.0.2 ICMP 98 Echo (ping) request  id=0x3b3d, seq=1/256, ttl=64
    2 0.000068518 10.0.0.2 → 10.0.0.1 ICMP 98 Echo (ping) reply    id=0x3b3d, seq=1/256, ttl=64 (request in 1)
特定の ToS 値が指定されたパケットのみ、キャプチャする (詳細表示)
パケット単位で詳細を表示するには -V オプションを指定します。
# tshark -i eth0 -V ip[1]=0xb8
Running as user "root" and group "root". This could be dangerous.
Capturing on 'eth0'
Frame 1: 98 bytes on wire (784 bits), 98 bytes captured (784 bits) on interface 0
    Interface id: 0 (eth0)
        Interface name: eth0
    Encapsulation type: Ethernet (1)
    Arrival Time: Oct 18, 2020 11:01:07.599728828 JST
    [Time shift for this packet: 0.000000000 seconds]
    Epoch Time: 1602986467.599728828 seconds
    [Time delta from previous captured frame: 0.000000000 seconds]
    [Time delta from previous displayed frame: 0.000000000 seconds]
    [Time since reference or first frame: 0.000000000 seconds]
    Frame Number: 1
    Frame Length: 98 bytes (784 bits)
    Capture Length: 98 bytes (784 bits)
    [Frame is marked: False]
    [Frame is ignored: False]
    [Protocols in frame: eth:ethertype:ip:icmp:data]
Ethernet II, Src: Vmware_be:6a:90 (00:50:56:be:6a:90), Dst: Vmware_be:cc:58 (00:50:56:be:cc:58)
    Destination: Vmware_be:cc:58 (00:50:56:be:cc:58)
        Address: Vmware_be:cc:58 (00:50:56:be:cc:58)
        .... ..0. .... .... .... .... = LG bit: Globally unique address (factory default)
        .... ...0 .... .... .... .... = IG bit: Individual address (unicast)
    Source: Vmware_be:6a:90 (00:50:56:be:6a:90)
        Address: Vmware_be:6a:90 (00:50:56:be:6a:90)
        .... ..0. .... .... .... .... = LG bit: Globally unique address (factory default)
        .... ...0 .... .... .... .... = IG bit: Individual address (unicast)
    Type: IPv4 (0x0800)
Internet Protocol Version 4, Src: 10.0.0.1, Dst: 10.0.0.2
    0100 .... = Version: 4
    .... 0101 = Header Length: 20 bytes (5)
    Differentiated Services Field: 0xb8 (DSCP: EF PHB, ECN: Not-ECT)
        1011 10.. = Differentiated Services Codepoint: Expedited Forwarding (46)
        .... ..00 = Explicit Congestion Notification: Not ECN-Capable Transport (0)
    Total Length: 84
    Identification: 0x43d1 (17361)
    Flags: 0x4000, Don't fragment
        0... .... .... .... = Reserved bit: Not set
        .1.. .... .... .... = Don't fragment: Set
        ..0. .... .... .... = More fragments: Not set
        ...0 0000 0000 0000 = Fragment offset: 0
    Time to live: 64
    Protocol: ICMP (1)
    Header checksum: 0x9c83 [validation disabled]
    [Header checksum status: Unverified]
    Source: 10.0.0.1
    Destination: 10.0.0.2
Internet Control Message Protocol
    Type: 8 (Echo (ping) request)
    Code: 0
    Checksum: 0xb6b4 [correct]
    [Checksum Status: Good]
    Identifier (BE): 15179 (0x3b4b)
    Identifier (LE): 19259 (0x4b3b)
    Sequence number (BE): 1 (0x0001)
    Sequence number (LE): 256 (0x0100)
    Timestamp from icmp data: Oct 18, 2020 11:01:07.000000000 JST
    [Timestamp from icmp data (relative): 0.599728828 seconds]
    Data (48 bytes)

0000  cf 2a 09 00 00 00 00 00 10 11 12 13 14 15 16 17   .*..............
0010  18 19 1a 1b 1c 1d 1e 1f 20 21 22 23 24 25 26 27   ........ !"#$%&'
0020  28 29 2a 2b 2c 2d 2e 2f 30 31 32 33 34 35 36 37   ()*+,-./01234567
        Data: cf2a090000000000101112131415161718191a1b1c1d1e1f...
        [Length: 48]
カラムに DSCP を追加する
(-V オプションを指定しない限り) デフォルトではキャプチャ結果に DSCP は表示されません。 デフォルトでは存在しないのですが、以下のように ~/.wireshark/preferences を作成することでキャプチャ結果に DSCP を追加することが出来ます。
# cat ~/.wireshark/preferences
gui.column.format:
        "No.", "%m",
        "Time", "%t",
        "Source", "%s",
        "Destination", "%d",
        "Protocol", "%p",
        "DSCP", "%f",
        "Length", "%L",
        "Info", "%i"
この設定を行うとキャプチャ結果は以下のようになります。 EF (0xb8) を付与したパケットをキャプチャした際に EF と表示されているのが分かります。
# tshark -i eth0 ip[1]=0xb8
Running as user "root" and group "root". This could be dangerous.
Capturing on 'eth0'


    1 0.000000000 10.0.0.1 → 10.0.0.2 ICMP EF PHB 98 Echo (ping) request  id=0x3b52, seq=1/256, ttl=64
    2 0.000077389 10.0.0.2 → 10.0.0.1 ICMP EF PHB 98 Echo (ping) reply    id=0x3b52, seq=1/256, ttl=64 (request in 1)
WireShark でパケットキャプチャする
WireShark でパケットキャプチャする際、特別な手順は必要ありませんが、カラム設定を調整することで DSCP 値を見やすく出来ます。
カラムに DSCP を追加する
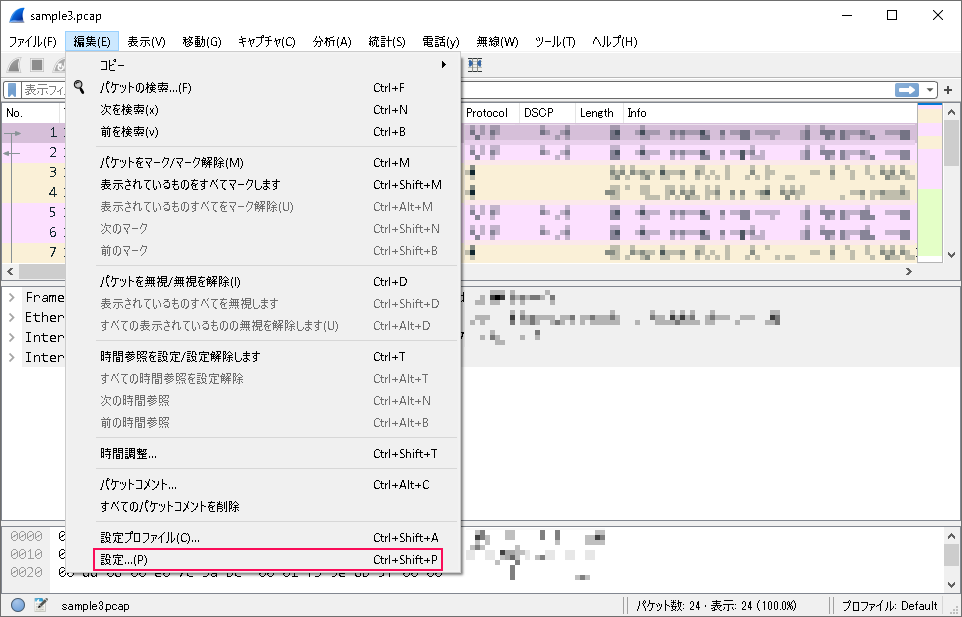
WireShark でもカラムに DSCP 表示を追加することが出来ます。 WireShark を起動し 編集 → 設定 をクリックします。
設定 ダイアログが開きますので 外観 → 列 から + マークをクリックして IP DSCP Value を追加します。
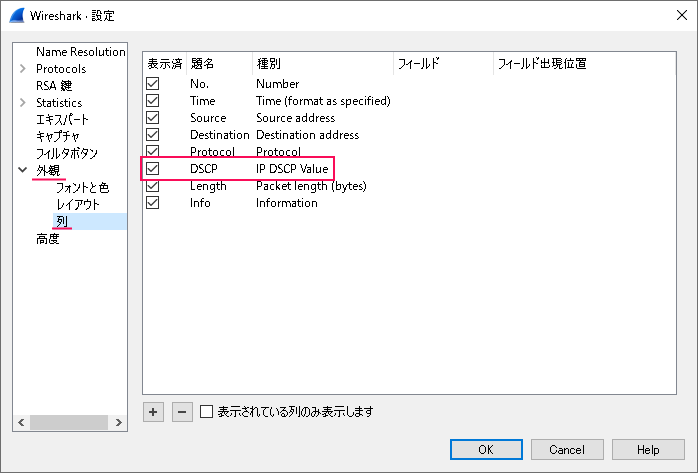
これでカラムに DSCP が追加されました。
